Jack Graham Photography www.jackgrahamphoto.com
Learn to See Learn to think Learn to create
Jack Graham Photograph www.jackgrahamphoto.com
Learn to See Learn to think Learn to create
_________________________________________________________________
2012 Workshop Schedule https://www.jackgrahamphoto.com/2012-workshop-schedule
2012 Registration Form REGISTRATION FORM 2012v9
Workshop Referrals: https://www.jackgrahamphoto.com/referrals
One on One, Individual Workshop information https://www.jackgrahamphoto.com/one-one-field-studio-photography-workshops
Workshop FAQ’s GENERAL WORKSHOP QUESTIONS_FAQ’S INFORMATION_v2012f
PODCAST: www.18percentgraymatter.com
______________________________________________________________________________
 Jack Graham E-Book Series 1 & 2 now available for purchase and instant download:
https://www.jackgrahamphoto.com/shop/e-books
_______________________________________________________________________
WHICH ONE WORKS?
This is a new feature I am going to publish here on my blog every week or two. I’ll discuss and compare images and talk about why I like one over the others.
This process is a common one that we all deal with in our digital darkroom. The final image is important for whatever project it’s being used for, and spending time determining which image works vs. another is well worth it. In many case the slightest difference in composition, light etc makes all the difference,
Often we may take many frames of a subject in different light and different angles. Each frame can evoke a different feeling to the subject.
Always remember that you need a good subject and acceptable light, or your final image will probably be less than desirable.
You comments, as always are more than welcome.
______________________________________________________________________
WHICH ONE WORKS ???.…………………. LOCATION: Antelope Canyon, Arizona
THE STORY: Prior to leading my workshop last year in Antelope Canyon ( late March 2011), I took a day for myself and spent some time making a few images in this glorious location. Because these canyons have been photographed so much, I am constantly looking for images different from what I have seen before. This is one such image. ( see workshop info above for 2012 Southwest Workshops)
Here is the image most photographed, do you recognize it? My goal was to find something different!
This subject has been photographed before by me and others. My challenge was to use the subject matter i.e. tumbleweed, and other material that had blown down the canyon from the opening above. It had been windy the past few days and there was more material here this year than in past years. This day was no exception.
Before I continue, for those who have never been into the canyon, you need you know this is somewhat of a “staged” image. If you have not seen this image before, it’s important to know that prior to continuing our discussion. The tumbleweed on the top was purposely placed there by other photographers, for the effect. (This is another whole discussion in itself). Though the tumbleweed does blow in and down the canyon, the chances of it being so precisely placed are remote. The tumbleweed on the ground was there naturally. Had I removed the tumbleweed on the ledge( which I personally would have liked to do) I was sure I’d incur the wrath of the other folks there making images. Though he sand does blown down the canyon walls from above, it usually never does in this volume or at this angle. Yes the sand was thrown up against the rock, only to fall to the ground, creating the patterns you see. Navajo guides do this for the photographers. I do like the sand effect..
Like most days the canyon was quite crowded. Finding an angle I liked and setting up a tripod, at the right time of day (about 11:30 am or so) was a challenge.
NOTE: I used ISO 2000 on purpose in order to attain the shutter speed I wanted( 2-2.5 seconds). My Nikon D700 handled this exceeding well. Images were processed identically in Adobe Lightroom , AdobePhotoshop CS4 and NIK Software. ( www.niksoftware.com —enter code JGRAHAM and receive a 15% discount)
TECH DATA: Image #1
Date/Time: 2011:03:31 11:27:59
Shutter speed: 2.5 sec Aperture: 16
Exposure mode: Av Exposure compensation: -1/3
ISO: 2000 Lens: 28 to 70mm Focal length: 40mm
TECH DATA: Image # 2
IMAGE 2 Date/Time: 2011:03:31 11:28:24
Shutter speed: 2 sec Aperture: 16
Exposure mode: Av Exposure compensation: -1/3
ISO: 2000 Lens: 28 to 70mm Focal length: 35mm
THE EDIT: I chose image #2
Editing these two images was easy.
1) As with all images I ask “What’s the subject” prior to making the photograph. To me it was the sand falling off the rock. My challenge was how to capture it. The pattern in the sand in image 2 is more defined and interesting. This is because of two simple reasons. The Navajo guide who threw the sand up against the rock for us did so prior to image #1. Because of this, he volume of sand is less in image #2, even though my shutter speed is 0.5 seconds less than # 1. ( NOTE: images were made only 25 seconds apart)
The motion of the sand falling in three lines created much more interest than that of the sand falling in image#1
This is why with these types of images it’s good to take many frames.
2) The tumbleweed on the bottom left, in image #2 is not cut off like it is in image #1. I repositioned my camera down and to the left, just a bit to encompass the image the way I wanted it. I also increased my focal length on my lens by 5 mm, from 40mm to 35mm. By doing this I also was able to bring out more of the sandstone on the lower left side.
Yes, little things can make a difference. Is # 1 a terrible image? If yo had not seen #2 what would you have thought? For most folks #1 would be just fine. However, if you are very critical of your work, (and you should be!) there is a vast difference between both images!
If I had not made image #2, image #1 would have been trashed!
When you are out making images, slow down, learn to see, and evaluate your environment. It’s always the small things that make an image work.
Send me some results!
Jack


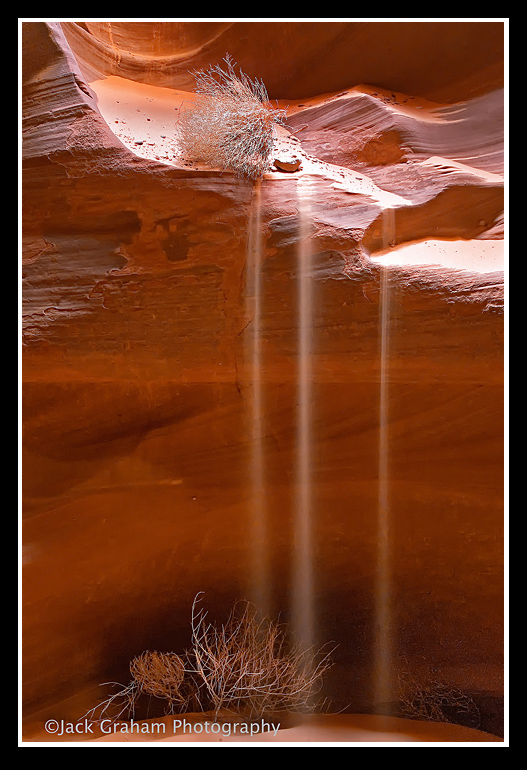
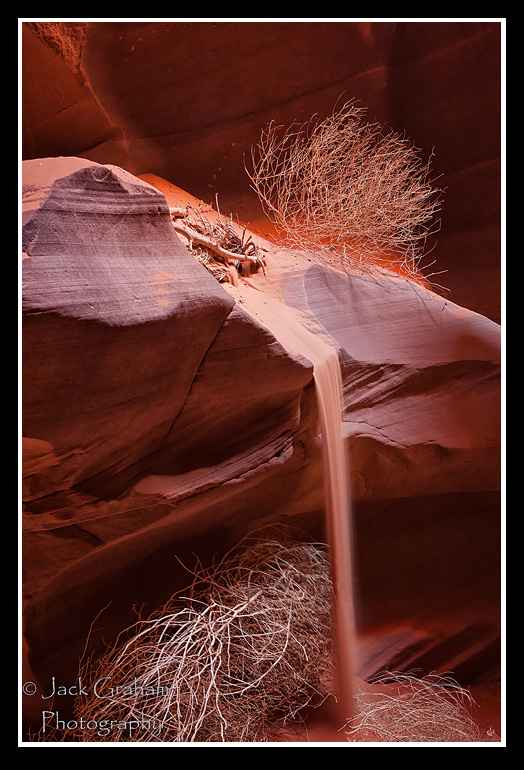
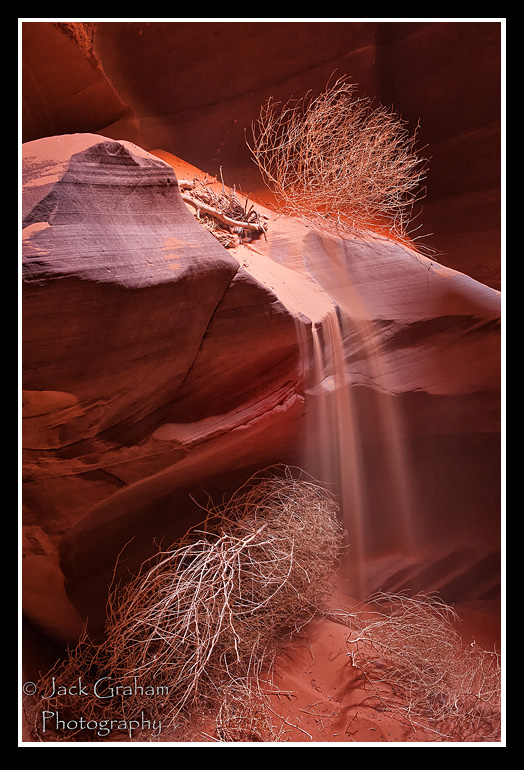
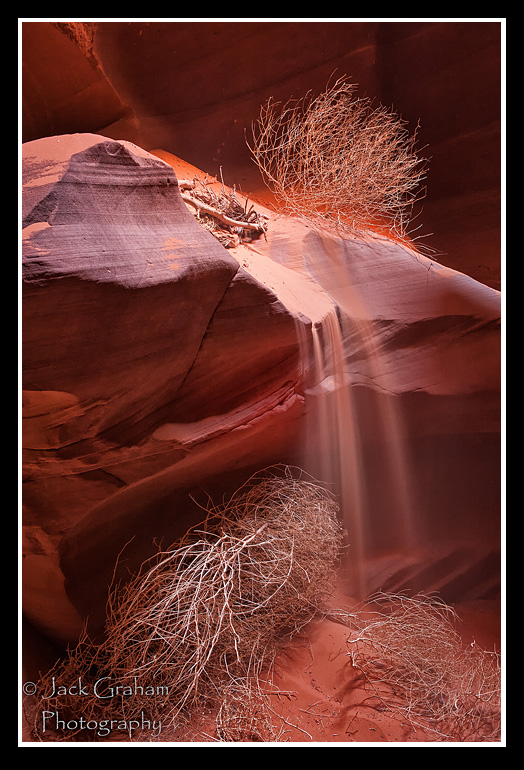
Image #2 is one of the most compelling and original photos I’ve seen of this over photographed location. Looking forward to your workshop in May.