Jack Graham Photography
Learn to See Learn to think Learn to create
 2012 Workshop Schedule https://www.jackgrahamphoto.com/2012-workshop-schedule
2012 Registration Form REGISTRATION FORM 2012v9
Workshop Referrals: https://www.jackgrahamphoto.com/referrals
One on One, Individual Workshop information https://www.jackgrahamphoto.com/one-one-field-studio-photography-workshops
Workshop FAQ’s GENERAL WORKSHOP QUESTIONS_FAQ’S INFORMATION_v2012f
PODCAST: www.18percentgraymatter.com
______________________________________________________________________________
Jack Graham E-Book Series 1 & 2 now available for purchase and instant download:
https://www.jackgrahamphoto.com/shop/e-books
_______________________________________________________________________
WHICH ONE WORKS? # 2
This is a new feature I am going to publish here on my blog every week or two. This is edition # 2 where I’ll discuss and compare images and talk about why I like one over the other(s).
This process of choosing one image over another is a common one that we all deal with in our digital darkroom. The final image is important for whatever project it’s being used for, and spending time determining which image works vs. another is well worth it. In many case the slightest difference in composition, light etc makes all the difference,
Often we may take many frames of a subject in different light and different angles. Each frame can evoke a different feeling to the subject.
Always remember that you need a good subject and acceptable light, or your final image will probably be less than desirable.
You comments, as always are more than welcome.
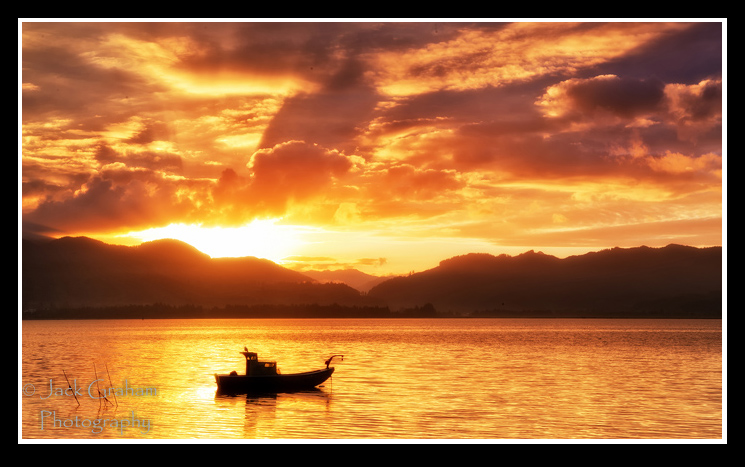
LOCATION: Sunrise on Tillamook Bay, Oregon Coast.
Lat: 45°29’27.276″N
Long: 123°55’3.684″W
There are few more dramatic sunrises along the Oregon coast than at Tilllamook Bay. Tillamook is about 30 miles south of the famous town and beach, Cannon Bach. It is important to be there at least ½ hour before the 1st light. Often the 1st light is more dramatic than the actual sunrise itself(depicted in these images) , however when there are clouds or fog in the area, making images even after the official sunrise time can be rewarding. The bad hooks around before entering the Pacific Ocean , so you are actually facing southeast in this location for sunrise, over the coastal range looking east. It’s important to not only get here before 1st light, but to hand in, especially on foggy overcast or days like this one. Things can change here in literally seconds.
THE STORY: I really love this spot. This is the 1st sunset on my Oregon Coast workshop as we begin to work our way down the Oregon Coast. It’s a great spot, but not at all an easy place to make a quality images. There are many challenges. I really like getting there at a really low tide, The patterns in the mud flats, and water are much better. However this morning, because I knew the weather was going to be a factor, I compromised and dealt with sunrise at high tide.
There are two big challenges here. Composition is one. There are so many ways to choose composition in this location. Choosing your focal length makes for different results. I have taken photographs at 17mm here, using a strong foreground all the way up to 300mm+ depending on the conditions. For this image I chose my Nikon 28-70mm ED-IF F2.8 lens. The second challenge is exposure. Because this light is very dramatic and has almost every tonal range possible, it was important to manually meter the scene, watch the histogram to nail the exposure as best as possible. IS this an image for HDR? Maybe… but these clouds were moving very very fast and that presents problems when taking multiple frames.
This boat has been anchored in this location for as long as I can remember. I’ve never seen the boat anchored here. It serves as a great prop, as well as an anchor (no pun intended!) to the image.
TECH DATA :
I manually metered this scene, spot metering, on a medium point in the image
Images made 10 minutes and 10 seconds apart
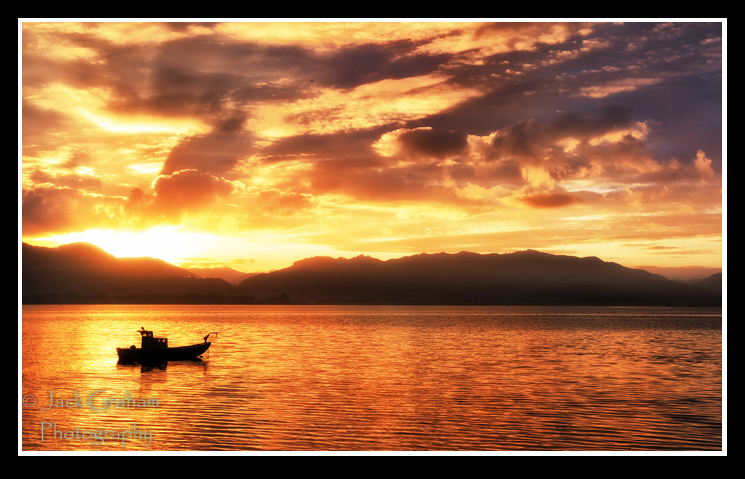
IMAGE #1 2010:07:03 04:50:15 ( July 7, 2010 at 4:40:15 AM) IMAGE #2 2010:07:03 04:50:30 ( July 7, 2010 at 4:50:30 AM)
Nikon D700 Nikon 28-70 ED-IF 2.8 Nikon D700 Nikon 28-70 ED-IF 2.8
Shutter speed: 1/10 sec at F 22 Shutter speed: 1/25 sec at F22
ISO 200 Exposure mode: Manual Metering: Spot ISO: 200 Exposure mode: Manual Metering: Spot
Focal length: 62mm Focal length: 48mm
Let’s discuss processing just for a minute. I did all my normal processing Adobe Lightroom ( you can see my workflow and processing information in my eBook Series 1 available for sale on my website
https://www.jackgrahamphoto.com/shop/e-books
I then used my ![]() NIK Software as follows:
NIK Software as follows:
1) Define 2.0—noise reduction. With my D700 at ISO200 there was virtually NO noise.
2) Viveza 2.0 – added some global structure to the clouds (see my glossary below & learn these terms). Brought a bit of the blue out in the sky on the right.
3) Color Efex 4 – I added just a tad of Brilliance & Warmth and then just a little Pro Contrast. What really makes these images look special is because I added “glamour glow” to each using NIK’S Color Efex 4. It just adds a finishing touch to the image. As always I added a vignette , using the Darken –Lighten center feature. This allowed me to put the centre point on the boat and adjust the amount of vignetting and the amount to darkening I wanted on the boarders.
After that I added a slight curve and adjusted my levels in Adobe Photoshop and completed the processing
PS—I bet image will look great in monochrome…. Get out the Silver Efex Pro! By the way, you can save 15% when purchasing NIK Software on NIK’S website www.niksoftware.com by using this promotional code! JGRAHAM
THE EDIT: I chose image # 1 for a few reasons
1) Though I actually like the positioning of the boat in image #2 a bit better, (Yes that’s a sea gull sitting on the top of the wheelhouse of the boat—could I have asked for more?)
2) Always ask your self when you are making the image (it’s too late when you get home!) “What’s the subject & how do you want to handle it. On those rare occasions when the sky is clear and there is no fog here, the boat can be the subject. However in these images the sky and color is the subject here. The boat serves to add balance and anchor the subject matter. Without the boat the image would already be strong.
3) I processed both images to the best of my ability, but I could not get the sky to look as dramatic in image #2 as images 31. Why was this? An easy answer… image #2 was taken 10 minutes and 10 seconds after image #2. The sun was higher and was beginning to wash out the sky. That’s why you get where you need to be early!
4) The composition in image #1 is tighter. It’s common for photographers, especially if you’ve never been to an area so beautiful or when you are there in this kind of great light, to want to use a really wide focal length and get as much of the scene in the image as possible. I call it writing the novel. Sometimes it’s better to write the sentence (or even the phrase) and create much more drama. I think this is a good example. Though each image is only 15mm apart, it’s just enough to make a difference in composition and feeling. You need to be aware of this when you are in the field.
5) Again, in a perfect world, I’d like that boat in image #1 just a tad to the left. Could I do that in Photoshop, sure, but that’s not my style (another discussion for another day), but I certainly can live with what we have here.
Let me know your thoughts. I’m always open for suggestions and comments.
JG


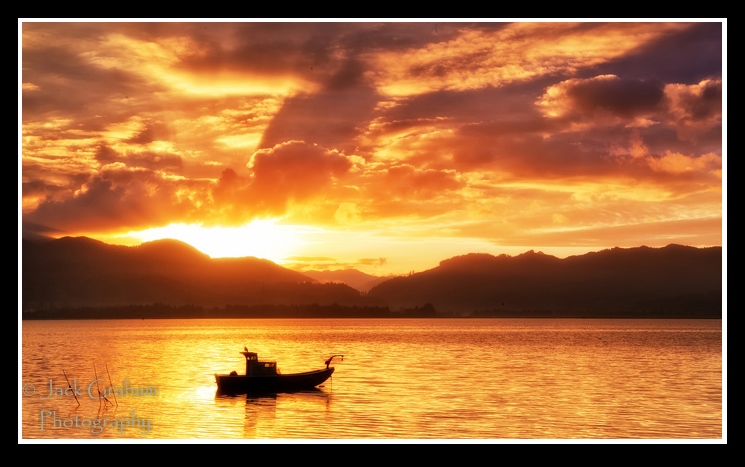
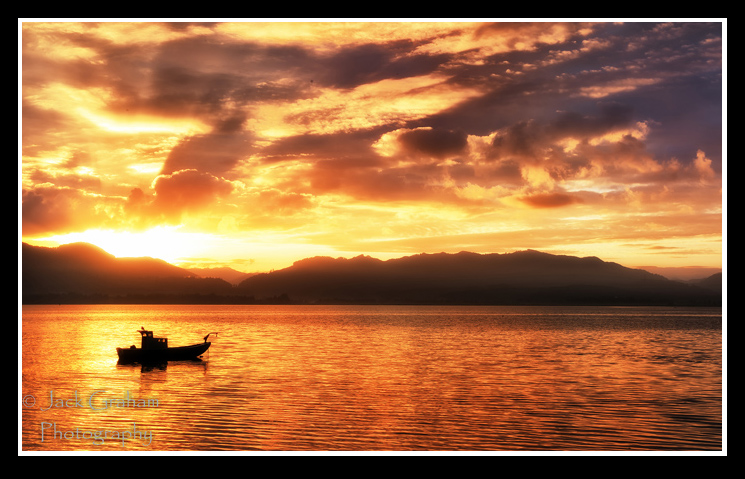
Hi, Jack. #1 was my definite choice because of the clouds in the top center. They look like they’re providing an “umbrella” for the rising sun. Also the color is great.
I really like the 2 posts you’ve done so far. Very educational.