JACK GRAHAM PHOTOGRAPHY WORKSHOPS www.jackgrahamphoto.com/photo-workshops
PODCAST (new edition–HDR online now) www.18percentgraymatter.com also available on iTUNES
PHOTOGRAPHING SUNRISE & SUNSET…………………………………………………….Text and images© Jack Graham and Jack Graham Photography LLC.

Sunrise over Napa Valley,CA
I think sometimes we take photographing sunrises and sunsets for granted. However to get a sunrise or sunset right takes more than just getting up early, getting to the location and hoping for magic light. I was reminded of this when photographing the images posted here on my blog yesterday. This was a very difficult sunset to capture, due to the extreme lighting conditions and the quickly encroaching tide on the centra lOregon Coast. I hope this article can reaffirm some of the ideas that you may already know, or help you get started capturing those wonderful scenes that my not be as easy to capture then one thinks!
TIMING IS EVERTHING
 Some refer to the best time of the day to be out making photographing as the “Golden Hour”. This is the time of day when the lighting is softer, the hue of the light is warmer and shadows are longer. When the sun is closer to the horizon, the light travels through more of the atmosphere, reducing the intensity of the direct light, so the illumination comes from indirect light. The bluish light is scattered, which makes the light from the sun appear more reddish and orange. In addition, the sun’s small angle on the horizon produces longer shadows.
The term hour can be more or less an hour, depending on your location. The quality of the lighting is determined by the sun’s altitude and what latitude you’re located on. For example if you live on the equator the altitude of the sun is higher so your “Golden Hour” is much less than one hour of time. In regions close to the poles there may be many hours of “Golden hour” light.
You can download a great application for your iPad or iPhone. You can also use it on your PC. This application will read your exact location and tell you the exact times for the best light, or in other words, tell you the times of the “Golden Hour”. http://www.golden-hour.com/

In addition you can also use something called the Photographers Ephemeris to plan your shoot. This application (program) will let you know the exact direction, rises and sets, of the sun, and moon and thus, the exact time of the good light. http://photoephemeris.com/.
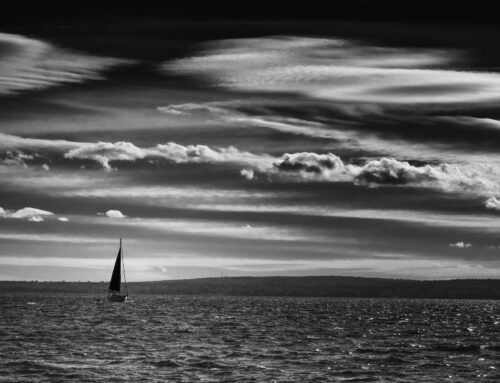
I also love to photograph the landscape even well before and after the golden hour. You will have to use a tripod and cable release as your exposures will be quite long. Often after a sunset or after the best light of the sunrise, the light will look poor again for a few minutes, and then get good, just before the darkness sets in or the sun comes up from over the horizon and the light becomes harsh. At sunset, look towards the western sky. You will often get a real light show. Remember, not every sunrise or sunset is a winner. You need to be patient get back to a location a few times and you’ll nail one for sure.

Sunset at Pigeon Point, California
Don’t forget the alpenglow! Alpenglow appears before sunrise, after sunset and lasts only a few minutes.
These rays bounce through the atmosphere twice, once on the way down to the earth and again on the way back up. Alpenglow is often a pinkish or orange palate.
I also recommend knowing your location. Get to a location the day before if possible and scout out where you want to be in the morning or evening.

Alpenglow over Devils Golf Course, Death Valley NP,
TECHNIQUE:
1) Try to always use a tripod, especially for long exposures, when you’re shutter is open for as much as perhaps 30 seconds.
2) Learn to meter properly. Often using your automatic metering systems in your cameras will be ineffective. I usually spot meter an area. Set your camera to the spot metering mode, and pick a location about 30 degrees off the sun. This is usually a good method to use when there isn’t a medium tone to meter off. You may need to experiment. Always check your histogram as well. You don’t want too much information far to the right (high exposure). Allowing for a bit of under-exposure, allows for more vivid colors of the setting and rising sun.
You might also want to try negative exposure compensation. This is easy. Just set your camera for negative compensation of 2/3 to 2 plus stops, depending on the amount of light in the sky
3) Be careful focusing, if you are shooting in auto focus, the camera will lock the focus on the sky, which has little or no contrast at all. The sensor will have difficulties locking and not be able to focus properly. You really should use using manual focus and set the focus distance to infinity. If you don’t the camera will lock the focus, and deliver a blurry picture.

Sunrise at Monument Valley,UT...use of F22 to create the sunstar
4) Watch your aperture settings. I try and use the smallest aperture possible. This gives me a large depth of field. Though I try and avoid F22 (most lenses are a bit soft at this setting) I will use F22 to try and create the sun star effect.
You may also need to use a graduated neutral density filter. You can read how these work here. http://www.singh-ray.com/grndgrads.html They are invaluable and can make or break an image.
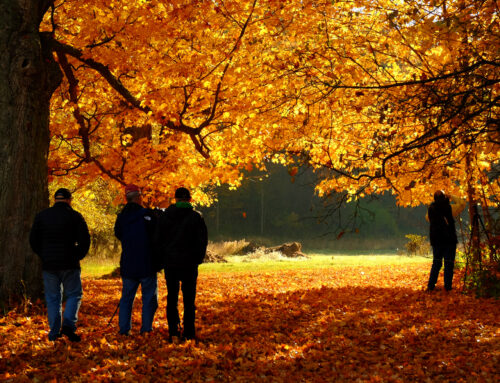
5) Let’s talk a bit about composition. The best to place for me to place the sun is at one of the sides of the frame, rather than at the center, (the rule of thirds) Always try and have some other interesting objects that will act as a foreground in the image as well. I always try and keep my horizon as close to the bottom (see above) of the scene as possible. showing off the great light in the sk. The bottom of the sceneHawaii is usually black anyway.

Silhouetted palm trees, Hawaii
6) Use silhouettes. Anything that a stick out in front of the sun is going is silhouetted. Move around and perhaps get down low enough to include some interesting features to silhouette in your image. However remember for good composition, never place features in the center of the frame.
7) Always shoot in RAW, rather than JPEG. IN the RAW conversion, when processing you will have a chance to salvage areas that are a bit overexposed (the sun for example). There are other benefits that are explained here (as well as 7 tips for making quality images) http://jackgrahamphoto.wordpress.com/2011/03/09/photo-tip-7-steps-to-make-great-photograph/

30 second exposure, Sunset at Pacific City, Oregon
8) Try using long exposures. This can be a lot of fun. You can make water extra silky looking and quite surreal. You’ll need to be at least 30 seconds or more to make this work.

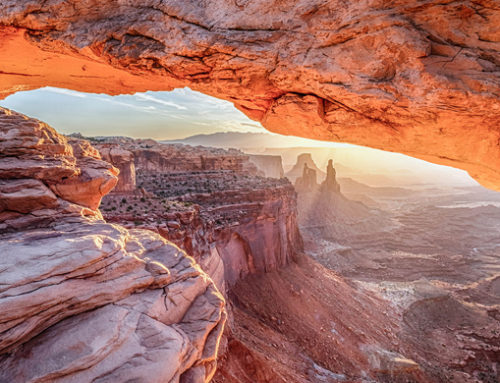
usind a wide angle lens to include a good foreground as well as capturing the sunrise at Mesa Arch
Use a telephoto lens to zoom in on the sun in a large way (Caution—NEVER look right at the sun—you can permanently damage your eyes) If you have “live view” on your camera this may help. This technique can produce dramatic images. Also experiment with wide angel lenses. You may have wide angle images with the sun towards the bottom of the image making the sky (if dramatic enough) add to your image. Lens selection it totally up to you!
Understand the Weather

After a storm at Cannon Beach, Oregon
The best sunsets are those where light clouds and haze are in the sky. The sunlight coming through the clouds and haze can create deep reds and purples. I also love the light right after a storm. If you can time it for a sunrise or sunset you’ll get some great light.
Also refer to this past article concerning weather for photographers http://jackgrahamphoto.wordpress.com/2010/12/15/weather-info-for-photographers-to-the-end-of-the-world-by-steve-gould/
Taking quality sunrise and sunset images is not as easy as some think. Simply pointing the camera at the horizon with today’s sophisticated equipment will not make it happen either. Always get to your location at least 45 minutes hour before sunrise and stay at least 45 minutes or later after sunsets. Pay attention to what is written here and go out and make some great images.

Sunrise at Trillium Lake, Oregon